Monday, December 31, 2012
Happy New Year Everyone!
This year I want to work on my blog more. Catch up on some pages and not wait to the last second to get my projects and gifts done! LOL Yes, I know. I will break those but still, it is nice to say! LOL
Wednesday, October 31, 2012
BBQ
Nothing like a BBQ!
The Spatula was cut out at 11 1/5" or use the "Cut to Length" button on the Expression. The oven mits were cut out at 3". Small rubber ants were used on top of the red checker pattern ribbon (Thanks Susan for having the ants!:
The steaming hot grill was cut out at 5". Love the Ruby Red Stickles that gave the grill a little sizzle.
Paradise Layout
Paradise was cut out at 3.5". I then cut out the Bird of Paradise as a layer at 3". I did not want it to match perfect.
The Palm Trees are cut out at 4.25" and the Sun was cut out at 3". Instead of using the sun's shadow as a shadow, I moved the toy layer to the side leaving more of the brown shadow showing. The Palm frowns are cut out of the same paper as the mats.
The mats are inked with brown distressed inks.
Friday, September 14, 2012
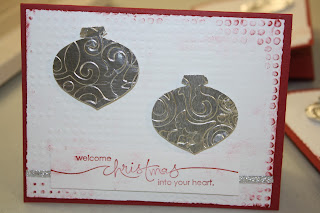
"Metal" Christmas Card
The "metal" ornimates on this page is actually tin foil that we all have in our kitchens. Glue the tin foil onto card stock. Then punch the "metal" with a punch. No need to buy expensive metals.
Thanks Maria for the techique!
Thursday, September 13, 2012
Birds
The Stampin Up bird punch is fast becoming a favorite of mine. I used green smooch to accent the leaves and white smooch for the eyes.
Praying Hands
I love the Praying Hand stamp. I used Viva Pearl Pen for the center of the flowers. The flowers are from a punch.
Sunday, August 19, 2012
Iris Paper Folding
This is my first attempt at Iris Paper Folding. As you see below, I did not follow the pattern to the T!
This is the start of Iris paper folding
Saturday, July 21, 2012
Friday, March 16, 2012
Booze Bouquet
The vase is actually a "POP CORN" bucket that was purchased from the Dollar Tree which was covered with scrapbooking paper. The flowers were cut from Mother's Day Bouquet Cricut cartridge. The small bottles of liquor were tabled to wooden sticks then wrapped in clear cellophane.
The flowers were inked to give them a distressed look. Moss is placed at the top to hide the sticks. In order to keep the arrangement from tipping over, small glass beads were placed in the bottom. Floral foam holds everything in place. A simple bow placed at the front to finish the project.
Santa Belt Layout
Fussy Cuts "Flower Garden"
Fussy Cuts "Forest Dreams"
Saturday, February 4, 2012
Giggle, Laugh, Smile Hanging Project "Indy Art"

After cutting out all of the chip board and base color card stock, I inked around the edges to add texture.
 Placing 3 card stock onto my cutting mat, I cut out the base pieces of each image and word. Bird is cut out at 2.25 inches. Rose is 3.5 inches, Lips is 2.06 inches, Butterfly is 2 inches, Heart is 2.5 inches and the close is 2.5 inches, Giggle, Smile and Laugh are all cut out at 1.75 inches .
  I am also a huge fan of Pop Dots! The bird, butterfly and the lips have all been pop dotted to make the project 3D.
 Monday, January 16, 2012
Ugly Paper Swap
This layout was made from what someone else called "Ugly Paper" at our local crafting meeting place.
Subscribe to:
Posts (Atom)


